While many Sophie Hines lingerie sewing patterns feature graphic design lines and color block options, they all contain a simple, easy version. We love a simple sew, but they are also great for another reason! You can use them to design your own colorblocking and interesting design lines! Here we have not just one lingerie design tip, eight of Sophie’s personal lingerie design tips to help you design your very own pattern hacks and color block variations.

LINGERIE DESIGN TIPS ONE AND TWO: DESIGN IN THE ROUND
Your garment has three distinct sections – the front, back, and side. Each of these areas is a separate opportunity for your creativity and innovation. Don’t focus solely on the front of your design, or leave your side seams as an afterthought. You may choose one area to be the starring focal point of the garment, but don’t waste the opportunity to give the others their own visual interest to support your design. Alternatively, you may decide that the design has no focal point, and each section has its own component of interest. Remember – you want to make an accessible design, which means limiting the pattern pieces and shapes to an amount that is easily cut and sewn by a hobby sewist.
Lay out your design so that you can see all sides at once, to help you visualize how the seams will move around the body and create a more balanced visual design.

LINGERIE DESIGN TIP THREE: CONSIDER YOUR CONSTRUCTION
When you’re designing a garment, keep the construction methods in mind. Since these garments will be made with overlock or zig zag seams which cannot be pivoted easily, you will want to make shapes that have straight lines or smooth, gentle curves that can be easily pinned and sewed. Avoid inserted points. Opt instead for pieces that can be assembled like a quilt top, where pieces are joined in an order that allows complex shapes to come together with only simple seams.

LINGERIE DESIGN TIP FOUR: DESIGNING SEAMS + SHAPES
One of the most important parts of designing for stretch fabrics is remembering that it will stretch. When you’re creating your design, keep in mind that this garment will be worn by people of all body shapes. That means that the chest, bum, hips, and stomach will be stretched at all different amounts, depending on the person. Wherever you place a seam places a strip of less-stretchy material across the body, which may cut into soft places, creating a silhouette under clothing that isn’t appreciated or just be plain uncomfortable to wear. If you want horizontal lines in your design, make sure that there is also room elsewhere in the garment to allow for stretch in this area.
In the example above, a stripe which goes around the circumference of the body of the garment introduces seams that may pop when pulling over the head and cut into the chest. Swapping for a curved stripe that moves across the front of the chest and down to the waistband at the sides allows room for ease within the fabric.
LINGERIE DESIGN TIP FIVE: ORDER OF OPERATIONS
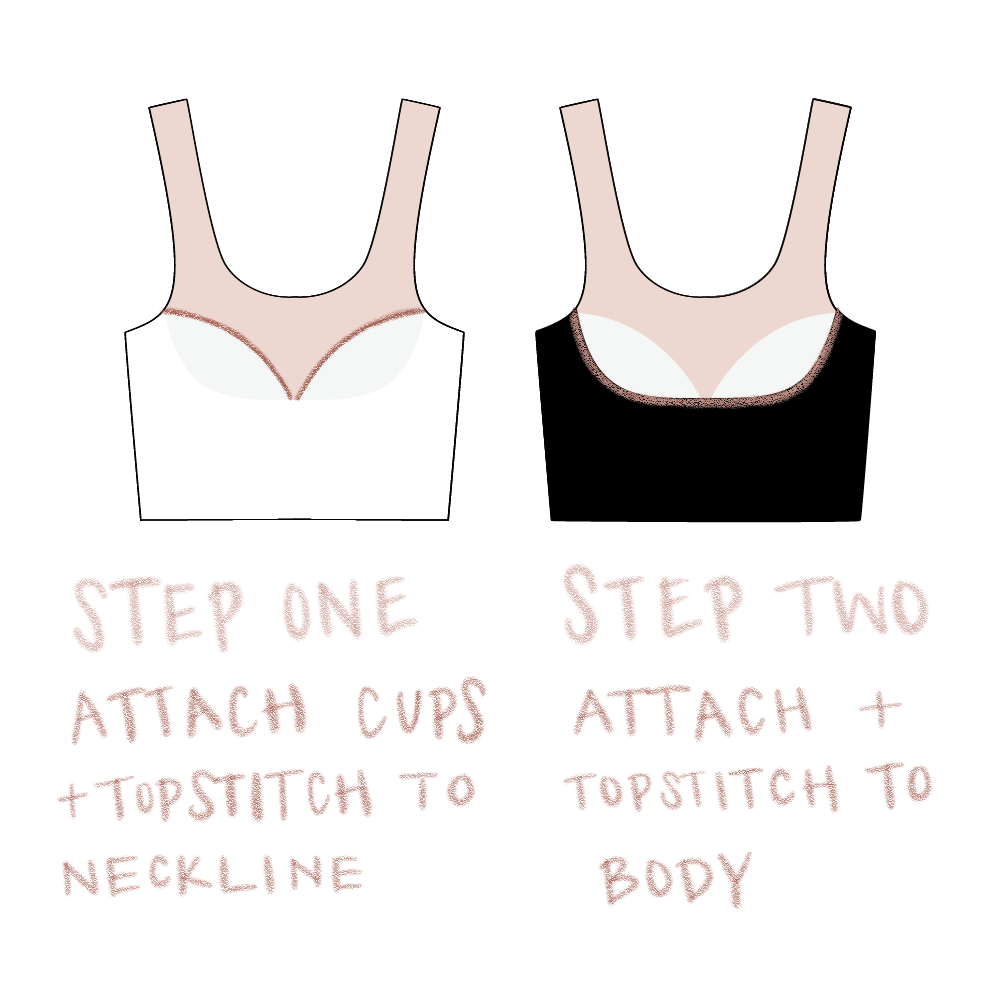
In garment construction, the Order of Operations may be even more important than the design itself, because it informs what is physically possible. The Order of Operations is the order in which your seams and garment components are assembled, and it vastly affects the ease in which your garment is made. When you’re designing a colorblock, it’s important to keep in mind how the pieces will fit together as you make the garment, so that you don’t sew yourself into a corner. Since these are all stretch fabrics, there is no hand sewing allowed, so make sure you can easily put every single one of your seams through a machine.
In the example above, first attaching the cups to the neckline is a breeze, and adding the body is one smooth curve. If you did it in the opposite order, however, you’d be stuck trying to get a clean finish on that acute center front neckline! Sign me up for no thanks!

SOPHIE’S DESIGN DO’S
- Design in the round
- Limit your pattern pieces to an accessible number
- Use only straight lines or gentle curves
- Incorporate visual interest to the sides and back
- Consider the Order of Operations to ensure an easy sew.

LINGERIE DESIGN TIP (DON’T) ONE: PAPER DOLL DESIGN
This is a design that has focused solely on the front, and possibly the sides, with the back completely left out. You can tell this type of garment when all of the design features are placed on the front of the garment. They wrap around the body, and just sort of end on the back, like the tabs on a paper doll outfit. The backs of these garments feel like a messy behind the scene where there’s nothing to appreciate and is a disappointment to look at.

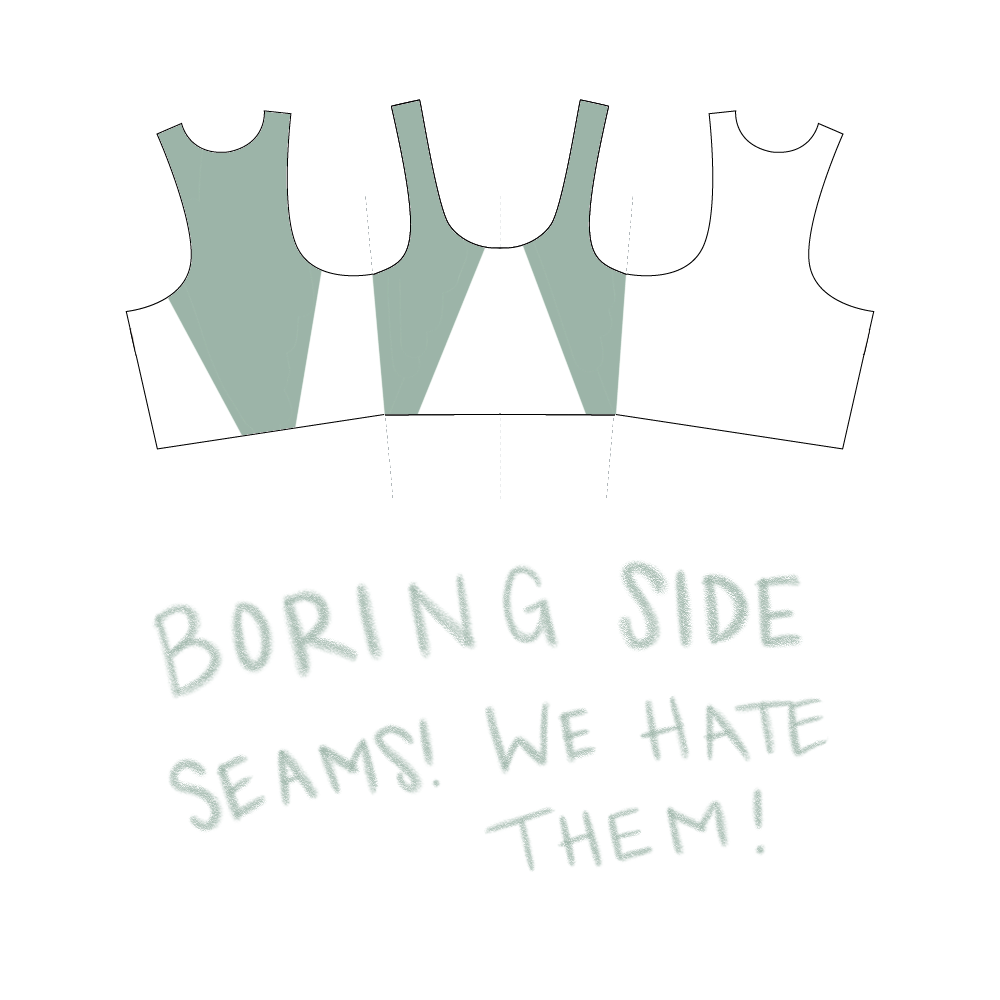
LINGERIE DESIGN TIP (DON’T) TWO: PLAIN SIDE SEAMS
If there is one thing Sophie hates, it’s regular straight side seams like you traced a sloper and left your design to perish in the desert. Such a waste! Challenge yourself to eliminate, relocate, or otherwise incorporate this design opportunity somewhere else in your garment’s construction. Some of Sophie’s solutions to this challenge are:
- Bringing the side seams forward on the Arccos Undies
- Bringing them to the front and placing them on an angle on the Coherence Panties
- Turning them into a three piece color block on the Axis Tank and Median Knickers
- Eliminating them altogether and using only a center back seam on the single color Axis Tank
- Adding a separate panel on the Altitude Thong

LINGERIE DESIGN TIP (DON’T) THREE: TIGHT CURVES
Tight curves are difficult to pin and sew in a stretch fabric. Overlock and zig zag stitches require a lot of space under the presser foot. It is not an easy task to navigate them while ensuring adequate stitch integrity and edge finishing. As mentioned previously, stick to straight seams and gentle curves.
SOPHIE’S DESIGN DONT’S
- Paper Doll Designs
- Plain Side Seams
- Tight Curves
We hope you enjoy these lingerie design tips!! Tag @sophie_hines in your instagram photos and we will cheer you on!
Enjoy!


