WELCOME BACK TO PERIOD PANTY SEWING SCHOOL!
It’s time to sew up the Period Panties! Our last post was all about prepping and cutting materials; if you need a refresher just click here, Period Panty Kits are here, and if you’re ready to sew, we’ll get started!
SEWING INSTRUCTIONS

Sew the side seams of your panty according to the directions in your pattern.

Locate the quilted absorbent layer of your prepped crotch pieces. Look closely – one side is a soft cotton + bamboo layer, and one side is a shiny slick wicking material.

Place the absorbent layer with the shiny wicking side down onto the black wicking jersey crotch layer. Pin, and sew together 1/4 inch from the edge of the absorbent layer with a straight stitch. You’ll now treat these two pieces as one.
TIP: The wicking jersey does not have a technically right side but it does have a slightly textured side, so use whichever side you want against your skin as the right side.
SEWING TIP: The bulky absorbent layer is easier to sew when you increase your stitch length. I increased the stitch length on my machine from 2.5 to 3.5. Play with your settings to see what works best for you!
SEWING TIP: Use Polyester thread for this project. Cotton and cotton blend threads are super great at wicking moisture, which will pull liquid into your seams and out into the outer layers of your garment. Not what we want here!

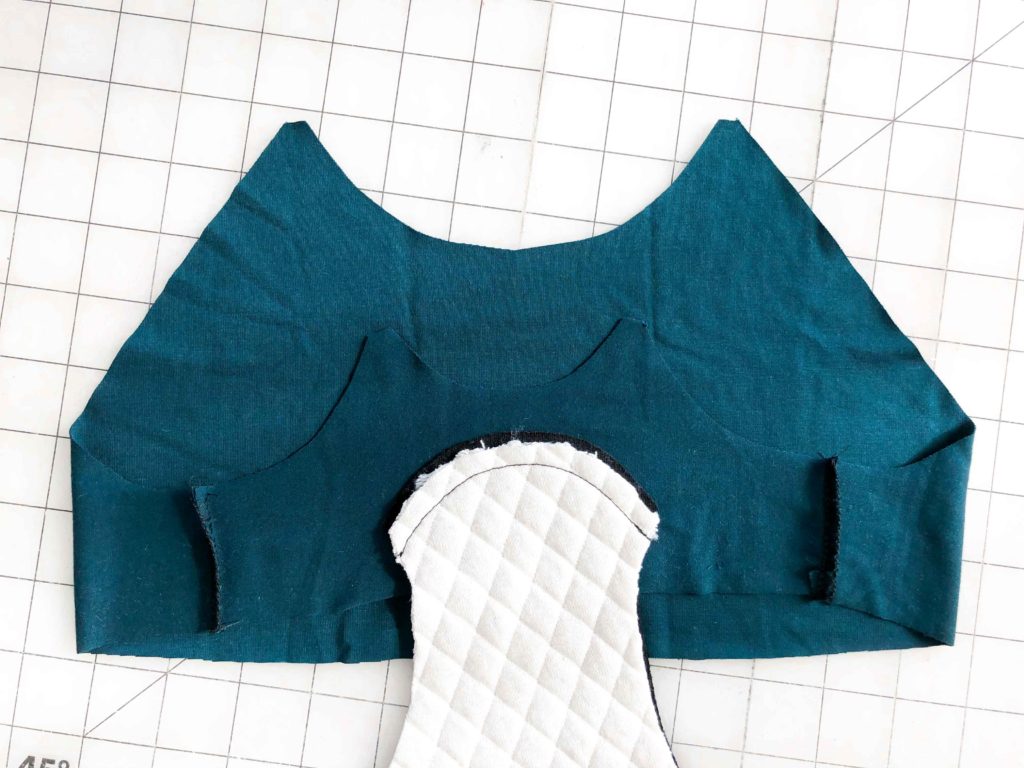
Ready to put the crotch in! Lay your panty and combined wicking + absorbent crotch pieces out according to the photo above. The panty should be inside out with the front up, waistband facing towards you and the crotch away from you. Lay the crotch wicking side down on top of it, matching the CROTCH FRONT with the PANTY FRONT.

Match up and pin the edges of the panty front and the wicking jersey.

Ease and pin the two curves together.

Once it’s pinned, unfold to double check. you should have your WICKING LAYER pinned to the WRONG SIDE of your PANTY FRONT. This is the inside of your Period Panties.

Fold the waistband of the panty up over the middle of your crotch. Then, fold the back crotch edge of the panty over the waistband, meeting the back edge of the wicking jersey crotch. (You can see the absorbent crotch layer peaking up at the already-pinned front crotch)

Match and pin the edges of the panty and crotch back, then ease and pin the curves together.

Here’s what you have so far! If you turn your panty right side out, you will see the quilted absorbent layer.

With your panty right side out, laying with the quilted absorbent layer facing against the table, lay your waterproof cotton layer over the top. The shiny slicky side is the wrong side, and the soft jersey side (right side) is facing down.

Match up front and back crotch seams. Remember, you don’t want to put extra holes into this, so use sewing clips, or whatever works best for you.

Sew the front and back crotch seams with a three step zig zag, or serge on an overlocker.
Since the waterproof layer doesn’t stretch much, nor does the combined wicking + quilted absorbent layers, this seam really isn’t too fussy. Just make sure your stretchy panty fabric, in the middle of these two layers, is pinned securely to the wicking layer so that it doesn’t go anywhere. Sew slowly, checking that the panty fabric isn’t folded or bunched, and that the two crotch layers are lining up well.
SEWING TIP: Always sew with the stretchiest, slipperiest, or otherwise least manageable material on the bottom. I sewed these with the slippery waterproof layer on the bottom, and made sure the panty and wicking crotch layers were all lined up, and serged it.

SEWING TIP: Try not to catch any of the quilted absorbent layer in these seams, because that will make it super bulky, which is not desired in a pair of undies.

Ta Dah! All finished! Don’t they look lovely?? I had a couple of small tucks in the panty fabric along the crotch seams, but we can’t win everything, right? Practice practice, and don’t use your favourite fabric for your first pair.

So lovely! When right side out, your Period Panties should have the wicking layer inside, quilted absorbent layer nicely tucked inside, and the waterproof cotton layer on the outside, with the waterproof side inside the panties. Whew! Got all that?

Up next in DIY Period Panty Sewing School, there will be posts with tips on getting the fold over elastic on just right, a tutorial for a super soft mesh waistband for crampy tummies, and a care and washing guide!
I’d love to see photos of what you make on Instagram, tag me @Sophie_hines and use the hashtag #shinesperiodpanties so we can follow along with you and get inspiration!
Happy Sewing!

