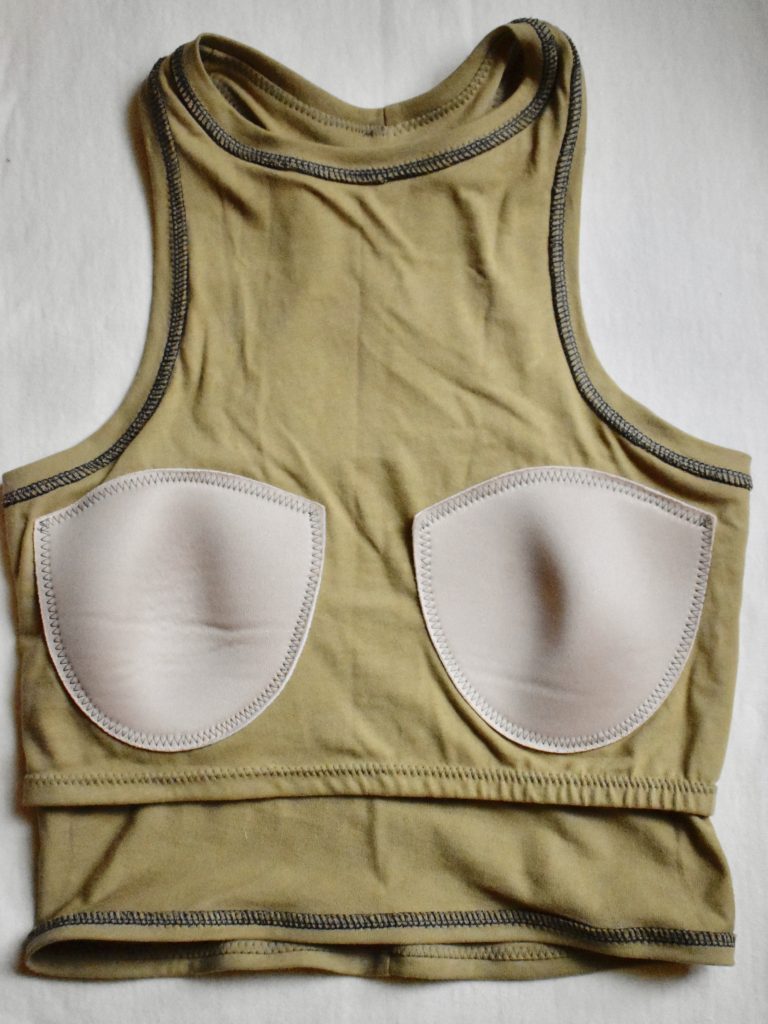
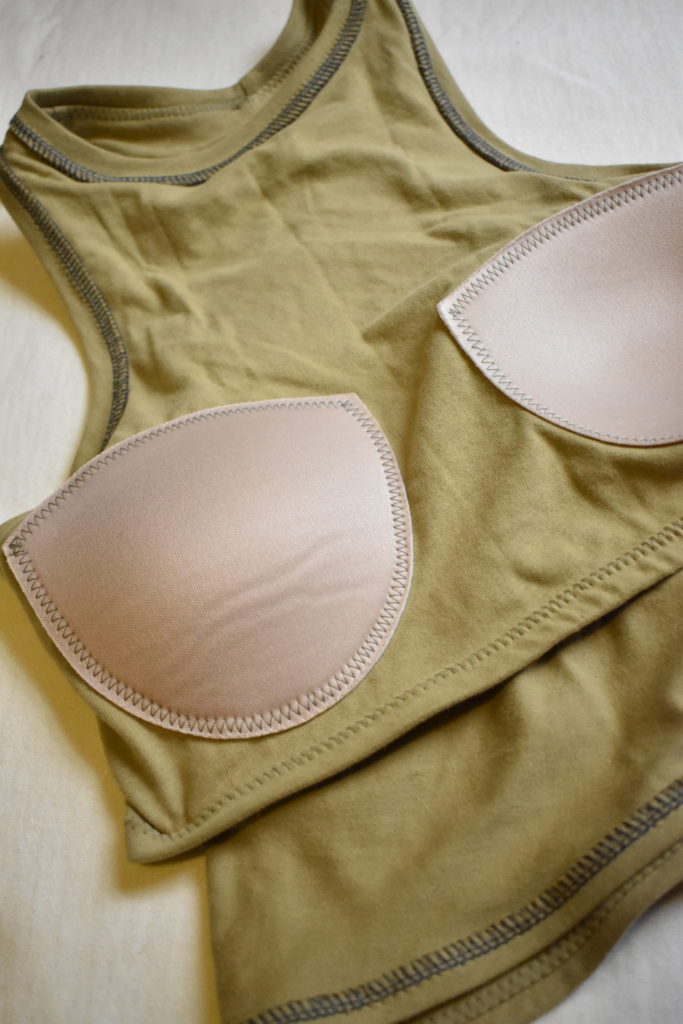
This is a guest post written by Alyssa of Alyssa’s Little Studio on how to insert a shelf bra in the Axis Tank.
Halfway through making my first Axis Tank, I knew there would be many more in my future. I loved the high crew neck on View 3, the many opportunities for color blocking, and the fact that it was such a great foundation for pattern hacking. With the heat of summer setting in, I started dreaming up a way I could wear the tank alone while also feeling a bit more supported. Coming off of some success making swimsuits, I decided to try to add a shelf bra with cups to the tank, not unlike adding a lining or shelf bra to a one-piece swimsuit. I’m excited to share the steps I followed to add a lining with bra cups to my Axis Tank!

Materials
- Axis Tank Pattern
- Fabric of your choice – For mine, I used a cotton jersey as I wanted it to be lightweight enough for the double layer to feel comfortable around my chest. Note about fabric: You will need to make sure you have a little extra fabric to cut out the lining
- ~1-2 yards of ½” knit elastic
- Bra cups (I like the flexible ones from Fabric Fairy, but any cup in your size should do the trick)

Pattern Adjustments
I made View 3 of the Axis Tank, though the instructions will be similar for all views. I started by adding 2” to the bottom hem of the top, measuring 2” down along the original hem. After making and wearing my first Axis Tank (without any added length), I decided 2” would put the hem right at my natural waist. Play around with adding length, how much you add may be different than mine.

Cut out two of the body of the tank top (Piece 2 for View 3) – one for the outside top, and the other for the shelf bra. Follow the cutting instructions for the rest of the pattern pieces.
If you are making Views 2 or 4, similarly extend the hem of your pattern pieces (Pieces 1 and 4 for View 2, and Pieces 2 and 4 for View 4). For View 2, you can simply use Piece 1 from View 1 for the shelf bra, just extend the hem of this piece the same amount you did for your others. If making View 4, use Piece 2 from View 3 as the shelf bra.
Sewing Instructions
Attaching the bra cups
Begin by placing your bra cups on the inside (right side) of your shelf bra piece. Try putting the fabric up to your body to mark on the fabric where you want the cups to sit. Place several pins around the outside of the cups to keep them in place, and try to flatten the cups against the fabric as you do this. Using a zig zag stitch, sew around the edge of the bra cups.

Stitch the back of the shelf bra and straps together right sides together, as if you are assembling the body of the tank (Steps 1-6).

On the wrong side, trim away the fabric that is sitting on the bra cups.
Note: The author chose this tip because after pinning the cups to the flat fabric, the fabric did not stretch nicely over the cups when worn, and it reduced bulk. An alternate method to try is to place and pin the cups to the tank while it is being worn on your body. This would ensure the fabric is stretched correctly during cup placement and pinning. Theoretically, this method would minimize the appearance of the cups by smoothing over the cup edges. However, take this with a grain of salt as it is purely conjecture from Sophie’s brain.

At this point, try on the shelf bra to decide where you want it to end on our torso. I knew I wanted mine to be shorter than the tank top and hit right below my chest. Mark the spot you want the hem to lie, and cut straight along this line. In my case, this ended up being about 2.5” from the original bottom.
Attaching the elastic
Now that you know where the shelf bra hem will be on your body, take the piece of ½” elastic and measure around the hem while wearing the bra. For the bra to slightly cinch under your bust, you will need to slightly stretch the elastic. Find the length of elastic you are comfortable with that has a slight stretch. In my case the hem of my shelf bra was ~28” around, and I ended up cutting a 26” elastic, 2” smaller than the hem and just enough to fit snug around my torso.
Attach the elastic to the wrong side of the hem of the shelf bra. Clips really come in handy here, but pins work too! Evenly distribute the elastic around the hem, placing ~4 clips/pins (you will need to slightly stretch the elastic as you sew so it lines up with the fabric). I like to place mine at the center front, back, and sides. In the center back, overlap the elastic slightly.

Use a zig-zag stitch to attach the elastic, sewing along the edge of the fabric.

Turn the elastic and fabric over to the wrong side, so that the fabric from the right side covers up the elastic. Use a zig-zag stitch to sew along the raw edge of the fabric and elastic. This creates a nice finish from the right side.

Set aside the shelf bra and assemble the body of your top using your other pattern piece(s).
Combining the internal and external pattern pieces
With wrong sides together, pin/clip the shelf bra to the body of your tank top along the neckline and armholes. You will now treat this as one piece for the final steps of your sewing.
Treating the two pieces as one, carefully attach and sew all of the bindings following the pattern instructions, making sure to catch both the shelf bra and outside tank.
And that wraps up the shelf bra hack for the Axis Tank! When you’re all done you will have a lovely lining with some extra supportive cups on the inside of your top. Try playing around with different fabrics, cups sizes, lengths, and more! I know I want to try one in a lightweight jersey, and maybe even extend the pattern into a dress.

Alyssa started sewing about 5 years ago, but only recently began sewing her own clothes. Her first two items of clothing were sewn with the help of her mom and grandmother, and she is constantly learning new sewing skills through indie sewing patterns and fellow sewists in the community. She loves playing with fabrics and patterns, and designing clothes that fit her body and show off her personality. She is currently pursuing a graduate degree in environmental science and is often thinking about sustainability and preserving the beautiful outdoors for future generations to enjoy. You can find Alyssa on her Instagram, or blog, where she writes about her sewing plans, inspiration, and creative pursuits.


